
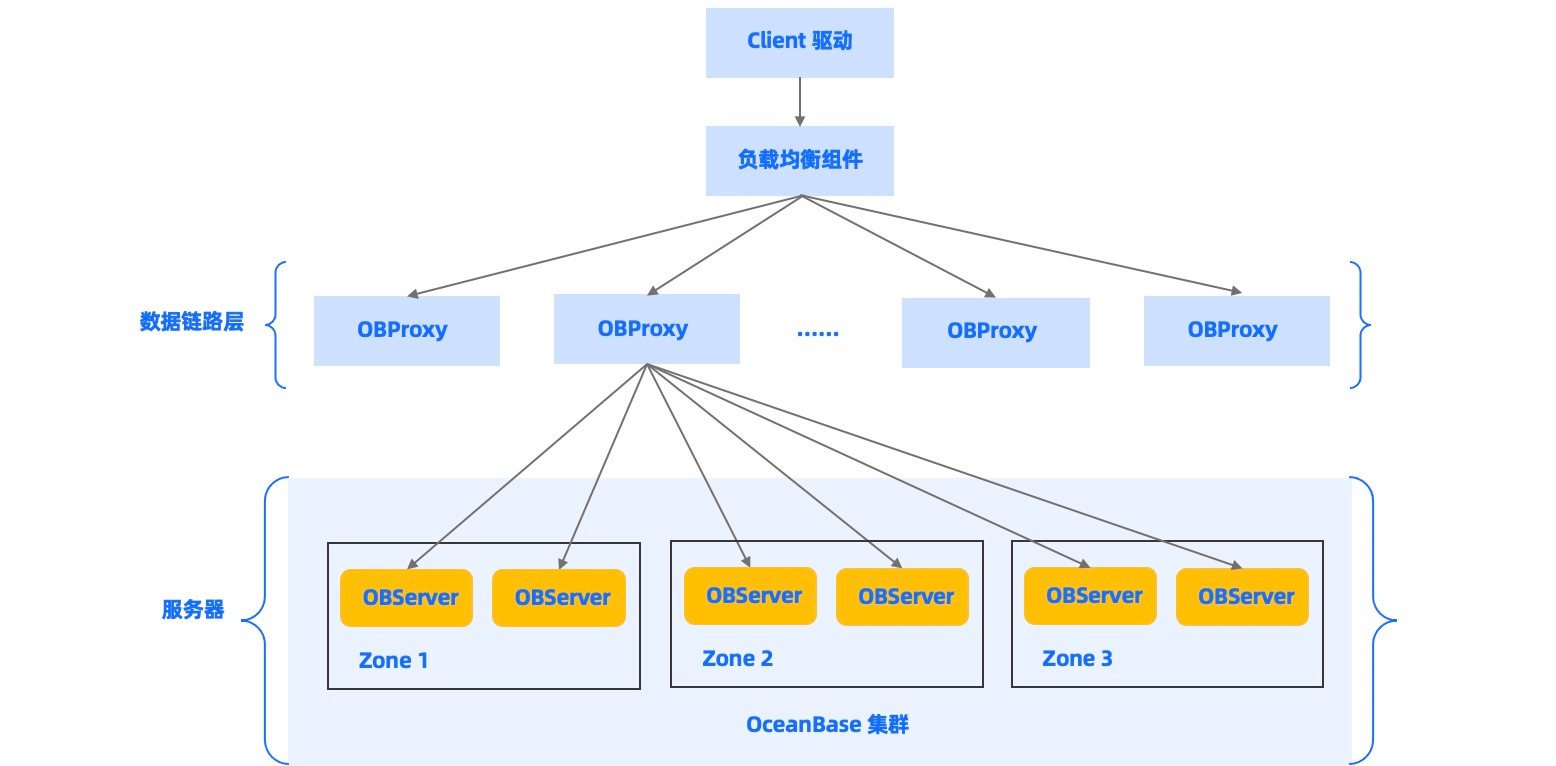
架构图:

系统基础环境优化—前提条件
部署前所有节点都需要进行优化:
https://www.oceanbase.com/docs/common-oceanbase-database-cn-1000000000035594
#调整OBserver的网卡MTU为9000


yum install -y yum-utils perl gcc automake autoconf libtool make git


#其它节点开始进行优化:
systemctl mask sleep.target suspend.target hibernate.target hybrid-sleep.target
systemctl status sleep.target
systemctl set-default multi-user.target
yum install -y yum-utils perl gcc automake autoconf libtool make expect device-mapper-persistent-data lvm2 chrony vim wget libxml2-devel net-tools ncurses-devel tar telnet gcc-c++ make cmake openssl openssl-devel rsync lsof iotop rsync lrzsz zip unzip xz gcc zlib sysstat bash-completion epel-release
swapoff -a && sed -i '/ swap / s/^\(.*\)$/#\1/g' /etc/fstab
sed -i "s/SELINUX=enforcing/SELINUX=disabled/g" /etc/selinux/config
swapoff -a

cat > /etc/security/limits.conf << 'EOF'
* soft stack 20480
* hard stack 20480
root soft stack 20480
root hard stack 20480
*               hard    nofile          655350
*               soft    nofile          655350
root            hard    nofile          655350
root            soft    nofile          655350
*               soft    nproc           655350
*               hard    nproc           655350
root            soft    nproc           655350
root            hard    nproc           655350
*               soft    core            unlimited
*               hard    core            unlimited
root            soft    core            unlimited
root            hard    core            unlimited
*               soft    sigpending      655350
*               hard    sigpending      655350
root            soft    sigpending      655350
root            hard    sigpending      655350
EOF
sed -i '/DefaultLimitNOFILE/c DefaultLimitNOFILE=65535' /etc/systemd/*.conf && systemctl daemon-reexec

cat >> /etc/sysctl.conf <<'EOF'
# Controls source route verification

net.ipv4.ip_nonlocal_bind = 1
net.ipv4.ip_forward = 1
# Do not accept source routing
net.ipv4.conf.default.accept_source_route = 0
# Controls the System Request debugging functionality of the kernel
kernel.sysrq = 0
# Controls whether core dumps will append the PID to the core filename.
# Useful for debugging multi-threaded applications.
kernel.core_uses_pid = 1
# Controls the use of TCP syncookies
net.ipv4.tcp_syncookies = 0

# Controls the default maxmimum size of a mesage queue
kernel.msgmnb = 65536
# # Controls the maximum size of a message, in bytes
kernel.msgmax = 65536
# Controls the maximum shared segment size, in bytes
kernel.shmmax = 68719476736
# # Controls the maximum number of shared memory segments, in pages
kernel.shmall = 4294967296

## 修改内核异步 I/O 限制
fs.aio-max-nr=1048576

## 网络优化

net.ipv4.conf.default.rp_filter = 1
net.ipv4.conf.default.accept_source_route = 0
net.ipv4.tcp_slow_start_after_idle=0

# TCP kernel paramater
net.ipv4.tcp_mem = 786432 1048576 1572864
net.ipv4.tcp_rmem = 4096 87380 16777216
net.ipv4.tcp_wmem = 4096 16384 16777216
net.ipv4.tcp_window_scaling = 1
net.ipv4.tcp_sack = 1
# socket buffer
net.core.wmem_default = 16777216
net.core.rmem_default = 16777216
net.core.rmem_max = 16777216
net.core.wmem_max = 16777216
net.core.netdev_max_backlog = 262144
net.core.somaxconn = 20480
net.core.optmem_max = 81920
# TCP conn
net.ipv4.tcp_max_syn_backlog = 262144
net.ipv4.tcp_syn_retries = 3
net.ipv4.tcp_retries1 = 3
net.ipv4.tcp_retries2 = 15
# tcp conn reuse
net.ipv4.tcp_timestamps = 0
net.ipv4.tcp_tw_reuse = 0
net.ipv4.tcp_tw_recycle = 0
net.ipv4.tcp_fin_timeout = 15
net.ipv4.tcp_max_tw_buckets = 20000
net.ipv4.tcp_max_orphans = 3276800
net.ipv4.tcp_synack_retries = 1
net.ipv4.tcp_syncookies = 0
# keepalive conn
net.ipv4.tcp_keepalive_time = 300
net.ipv4.tcp_keepalive_intvl = 30
net.ipv4.tcp_keepalive_probes = 3
net.ipv4.ip_local_port_range = 3500 65535
# swap
vm.nr_hugepages = 100
vm.overcommit_memory = 1
vm.swappiness = 0
net.ipv6.conf.all.disable_ipv6 = 1
net.ipv6.conf.default.disable_ipv6 = 1
net.bridge.bridge-nf-call-ip6tables = 1
net.bridge.bridge-nf-call-arptables = 1
net.bridge.bridge-nf-call-iptables=1
net.ipv4.ip_forward=0
fs.file-max=52706963
fs.nr_open=52706963
vm.dirty_background_ratio = 5
vm.dirty_ratio = 10

kernel.pid_max=65535
kernel.threads-max=65535

# Disable IPVS connection reuse mode
net.ipv4.vs.conn_reuse_mode=0

#arp cache gc
net.ipv4.neigh.default.gc_thresh1 = 80000
net.ipv4.neigh.default.gc_thresh2 = 90000
net.ipv4.neigh.default.gc_thresh3 = 100000

#inotify limit
fs.inotify.max_user_watches=524288
EOF

#打开 inotify_add_watch 跟踪
echo 1 >> /sys/kernel/debug/tracing/events/syscalls/sys_exit_inotify_add_watch/enable

modprobe br_netfilter && sysctl -p
timedatectl set-timezone Asia/Shanghai

cat > /etc/chrony.conf <<'EOF'
# Use public servers from the pool.ntp.org project.
# Please consider joining the pool (http://www.pool.ntp.org/join.html).
pool ntp.aliyun.com iburst

# Record the rate at which the system clock gains/losses time.
driftfile /var/lib/chrony/drift

# Allow the system clock to be stepped in the first three updates
# if its offset is larger than 1 second.
makestep 1.0 3

# Enable kernel synchronization of the real-time clock (RTC).
rtcsync

# Enable hardware timestamping on all interfaces that support it.
#hwtimestamp *

# Increase the minimum number of selectable sources required to adjust
# the system clock.
#minsources 2

# Allow NTP client access from local network.
#allow 192.168.0.0/16

# Serve time even if not synchronized to a time source.
#local stratum 10

# Specify file containing keys for NTP authentication.
keyfile /etc/chrony.keys

# Get TAI-UTC offset and leap seconds from the system tz database.
leapsectz right/UTC

# Specify directory for log files.
logdir /var/log/chrony

# Select which information is logged.
#log measurements statistics tracking
EOF
systemctl restart chronyd
systemctl enable chronyd
chronyc sources
chronyc makestep

iptables -P FORWARD ACCEPT
iptables -P INPUT ACCEPT
iptables -P OUTPUT ACCEPT
iptables -nL
iptables -F
iptables -X
iptables -Z
iptables -nL

systemctl stop firewalld.service
systemctl disable firewalld.service


cat >> /usr/lib/systemd/system/rc-local.service << 'EOF'
[Install]
WantedBy=multi-user.target
Alias=rc-local.service
EOF


chmod +x /etc/rc.local
systemctl daemon-reload
systemctl restart rc-local
systemctl enable rc-local


#对于 CentOS 或 Red Hat 操作系统,需要运行以下命令,手动关闭透明大页:
echo never > /sys/kernel/mm/transparent_hugepage/enabled

#把cpu调成高性能
yum install kernel-tools -y

for((i=0;i<=47;i++));do echo performance > /sys/devices/system/cpu/cpu${i}/cpufreq/scaling_governor;done

#中控机ssh免密登录
yum install -y expect
ssh-keygen -t rsa -P "" -f /root/.ssh/id_rsa

#密码更换,自己的root密码
export mypass=xxx

name=(hz-c3b16-ocb-d1 hz-c3b16-ocb-d2 hz-obproxy-ocp-d1 hz-obproxy-ocp-d2 hz-obproxy-ocp-d3 hz-obproxy-public-d1 hz-obproxy-public-d2 hz-obproxy-public-d3 hz-c3b17-ocb-d3 hz-c3b17-ocb-d4 hz-obproxy-ocp-d4 hz-obproxy-ocp-d5 hz-obproxy-ocp-d6 hz-obproxy-public-d4 hz-obproxy-public-d5 hz-obproxy-public-d6 hz-c3b14-ocb-d5 hz-obproxy-public-d7 hz-obproxy-public-d8 hz-obproxy-public-d9)

#所有节点添加hosts
cat >> /etc/hosts <<'EOF'
#zone1
10.1.26.201 hz-c3b16-ocb-d1
10.1.26.202 hz-c3b16-ocb-d2
10.1.26.207 hz-obproxy-ocp-d1
10.1.26.208 hz-obproxy-ocp-d2
10.1.26.209 hz-obproxy-ocp-d3
10.1.26.210 hz-obproxy-public-d1
10.1.26.211 hz-obproxy-public-d2
10.1.26.212 hz-obproxy-public-d3

#zone2
10.1.29.11 hz-c3b17-ocb-d3
10.1.29.12 hz-c3b17-ocb-d4
10.1.29.27 hz-obproxy-ocp-d4
10.1.29.28 hz-obproxy-ocp-d5
10.1.29.29 hz-obproxy-ocp-d6
10.1.29.31 hz-obproxy-public-d4
10.1.29.32 hz-obproxy-public-d5
10.1.29.33 hz-obproxy-public-d6

#zone3
10.1.30.11 hz-c3b14-ocb-d5
10.1.30.31 hz-obproxy-public-d7
10.1.30.32 hz-obproxy-public-d8
10.1.30.33 hz-obproxy-public-d9

EOF

#中控机免密登录
for i in ${name[@]};do
expect -c "
spawn ssh-copy-id -i /root/.ssh/id_rsa.pub root@$i
  expect {
    \"*yes/no*\" {send \"yes\r\"; exp_continue}
    \"*password*\" {send \"$mypass\r\"; exp_continue}
    \"*Password*\" {send \"$mypass\r\";}
  }"
done


#OBserver节点配置磁盘分区。注意每个OBserver节点的盘符号都不一样,需要核对相应的容量修改盘符
/data 为数据盘。
/redo 存放 redo 日志。
/home/admin/oceanbase 存放 OceanBase 数据库的二进制文件和运行日志。

#这里所有节点都创建目录
mkdir /{data,redo}
mkdir /home/admin/oceanbase -p

#这里只需在OBserver节点配置分区
mkfs.ext4 /dev/nvme0n1
parted /dev/nvme0n1 mklabel gpt yes
parted /dev/nvme0n1 mkpart primary 0% 100%
pvcreate /dev/nvme0n1
vgcreate -s 16M data /dev/nvme0n1p1
lvcreate -l 100%FREE -n lv1 data
mkfs.ext4 /dev/data/lv1
mount /dev/data/lv1 /data
echo `blkid /dev/data/lv1 | awk '{print $2}' | sed 's/\"//g'` /data ext4 defaults,_netdev 0 0 >> /etc/fstab

mkfs.ext4 /dev/sdb
parted /dev/sdb mklabel gpt yes
parted /dev/sdb mkpart primary 0% 100%
pvcreate /dev/sdb1
vgcreate -s 16M redo /dev/sdb1
lvcreate -l 100%FREE -n lv1 redo
mkfs.ext4 /dev/redo/lv1
mount /dev/redo/lv1 /redo
echo `blkid /dev/redo/lv1 | awk '{print $2}' | sed 's/\"//g'` /redo ext4 defaults,_netdev 0 0 >> /etc/fstab

#所有节点都创建admin用户
useradd -U admin -d /home/admin -s /bin/bash
sudo chown -R admin:admin /home/admin
echo "xxx" | passwd --stdin admin

echo 'admin       ALL=(ALL)       NOPASSWD: ALL' >> /etc/sudoers
chown -R admin:admin /data
chown -R admin:admin /redo
chown -R admin:admin /home/admin
OBD开始部署OBserver集群
由于OceanBase的副本数量默认是根据zone的数量来分配的,所以配置文件要把5台服务器分成5个zone,2台zone放在机房1,2台zone放在机房2,2台zone放在机房3,机器和机房的数量形成2:2:1的比例。即是同一个集群,两地三中心五副本模式!也可以是同城三中心五副本模式!
#下载安装包
wget https://obbusiness-private.oss-cn-shanghai.aliyuncs.com/download-center/opensource/observer/v4.2.0_CE/oceanbase-ce-utils-4.2.0.0-100010032023083021.el7.x86_64.rpm
wget https://obbusiness-private.oss-cn-shanghai.aliyuncs.com/download-center/opensource/oceanbase-all-in-one/7/x86_64/oceanbase-all-in-one-4.2.0.0-100120230821114201.el7.x86_64.tar.gz
#解压执行脚本
tar zxf oceanbase-all-in-one-4.2.0.0-100120230821114201.el7.x86_64.tar.gz
cd oceanbase-all-in-one/bin/
./install.sh
#执行完脚本,会输出显示让我们执行生效环境变量的命令,否则会没有obd的命令
source ~/.oceanbase-all-in-one/bin/env.sh
which obd
obd --version
which obclient
chown -R admin.admin /home/admin/
su - admin
#生成SSH密钥【admin】所有机器执行
su -c 'ssh-keygen -t rsa -P "" -f /home/admin/.ssh/id_rsa' admin
#中控机admin免密登录
export mypass=xxxx
name=(hz-c3b16-ocb-d2 hz-obproxy-ocp-d1 hz-obproxy-ocp-d2 hz-obproxy-ocp-d3 hz-obproxy-public-d1 hz-obproxy-public-d2 hz-obproxy-public-d3 hz-c3b17-ocb-d3 hz-c3b17-ocb-d4 hz-obproxy-ocp-d4 hz-obproxy-ocp-d5 hz-obproxy-ocp-d6 hz-obproxy-public-d4 hz-obproxy-public-d5 hz-obproxy-public-d6 hz-c3b14-ocb-d5 hz-obproxy-public-d7 hz-obproxy-public-d8 hz-obproxy-public-d9)
for i in ${name[@]};do
expect -c "
spawn ssh-copy-id -i /home/admin/.ssh/id_rsa.pub admin@$i
expect {
\"*yes/no*\" {send \"yes\r\"; exp_continue}
\"*password*\" {send \"$mypass\r\"; exp_continue}
\"*Password*\" {send \"$mypass\r\";}
}"
done
#安装oceanbase数据库,修改配置文件。注意需要根据服务器内存和cpu进行调整!
#修改用户名和密码。每台机器的 IP、home_path、data_dir 和 redo_dir。
vim distributed-with-obproxy-example.yaml
user:
username: admin
password: xxx
key_file: /home/admin/.ssh/id_rsa
oceanbase-ce:
servers:
- name: server1
ip: 10.1.26.201
- name: server2
ip: 10.1.26.202
- name: server3
ip: 10.1.29.11
- name: server4
ip: 10.1.29.12
- name: server5
ip: 10.1.30.11
global:
devname: eth0
memory_limit: 115G
system_memory: 10G
syslog_level: INFO
enable_syslog_wf: false
enable_syslog_recycle: true
max_syslog_file_count: 4
appname: obcluster
root_password: 'xxx'
proxyro_password: 'xxx'
server1:
mysql_port: 2881
rpc_port: 2882
home_path: /home/admin/oceanbase/ob
data_dir: /data/ob
redo_dir: /redo/ob
zone: zone1
server2:
mysql_port: 2881
rpc_port: 2882
home_path: /home/admin/oceanbase/ob
data_dir: /data/ob
redo_dir: /redo/ob
zone: zone2
server3:
mysql_port: 2881
rpc_port: 2882
home_path: /home/admin/oceanbase/ob
data_dir: /data/ob
redo_dir: /redo/ob
zone: zone3
server4:
mysql_port: 2881
rpc_port: 2882
home_path: /home/admin/oceanbase/ob
data_dir: /data/ob
redo_dir: /redo/ob
zone: zone4
server5:
mysql_port: 2881
rpc_port: 2882
home_path: /home/admin/oceanbase/ob
data_dir: /data/ob
redo_dir: /redo/ob
zone: zone5
obproxy-ce:
depends:
- oceanbase-ce
servers:
- 10.1.26.207
- 10.1.26.208
- 10.1.26.209
- 10.1.26.210
- 10.1.26.211
- 10.1.26.212
- 10.1.29.27
- 10.1.29.28
- 10.1.29.29
- 10.1.29.31
- 10.1.29.32
- 10.1.29.33
- 10.1.30.31
- 10.1.30.32
- 10.1.30.33
global:
listen_port: 2883
prometheus_listen_port: 2884
home_path: /home/admin/obproxy
rs_list: 10.1.26.201:2881;10.1.26.202:2881;10.1.29.11:2881;10.1.29.12:2881;10.1.30.11:2881
enable_cluster_checkout: false
cluster_name: obcluster
skip_proxy_sys_private_check: true
enable_strict_kernel_release: false
observer_root_password: 'xxx'
obproxy_sys_password: 'xxx'
observer_sys_password: '*xxx'
#安装集群
obd cluster deploy obcluster -c distributed-with-obproxy-example.yaml
#如果提示目录不为空,或者部署失败,则需要重新把所有observer目录删除
rm -rf /home/admin/oceanbase/ob
rm -rf /data/ob
#再次授权ping命令,否则又可能启动失败
chmod u+s /usr/sbin/ping
#安装完成,启动集群
obd cluster start obcluster
#如果需要重新部署集群,下面这个是OBD的强制重新部署命令。谨慎此命令,如果集群有数据,不能执行!这是重新部署的新集群!!!
obd cluster redeploy obcluster -c distributed-with-obproxy-example.yaml -f
#下载同版本的oceanbase-ce-utils-4.2版本
#把下载好的rpm包解压,默认会解压在当前路径的./usr/bin/ob_admin
rpm2cpio oceanbase-ce-utils-4.2.0.0-100010032023083021.el7.x86_64.rpm | cpio -div
#把ob_admin脚本分发到每个observer节点的安装目录bin下,并授权admin
cp ./usr/bin/ob_admin /home/admin/oceanbase/ob/bin/
chown admin.admin /home/admin/oceanbase/ob/bin/ob_admin
name=(hz-c3b16-ocb-d2 hz-c3b17-ocb-d3 hz-c3b17-ocb-d4 hz-c3b14-ocb-d5)
for i in ${name[@]};do
scp ./usr/bin/ob_admin $i:/home/admin/oceanbase/ob/bin/
ssh $i 'chown admin.admin /home/admin/oceanbase/ob/bin/ob_admin && ls -l /home/admin/oceanbase/ob/bin/ob_admin'
done
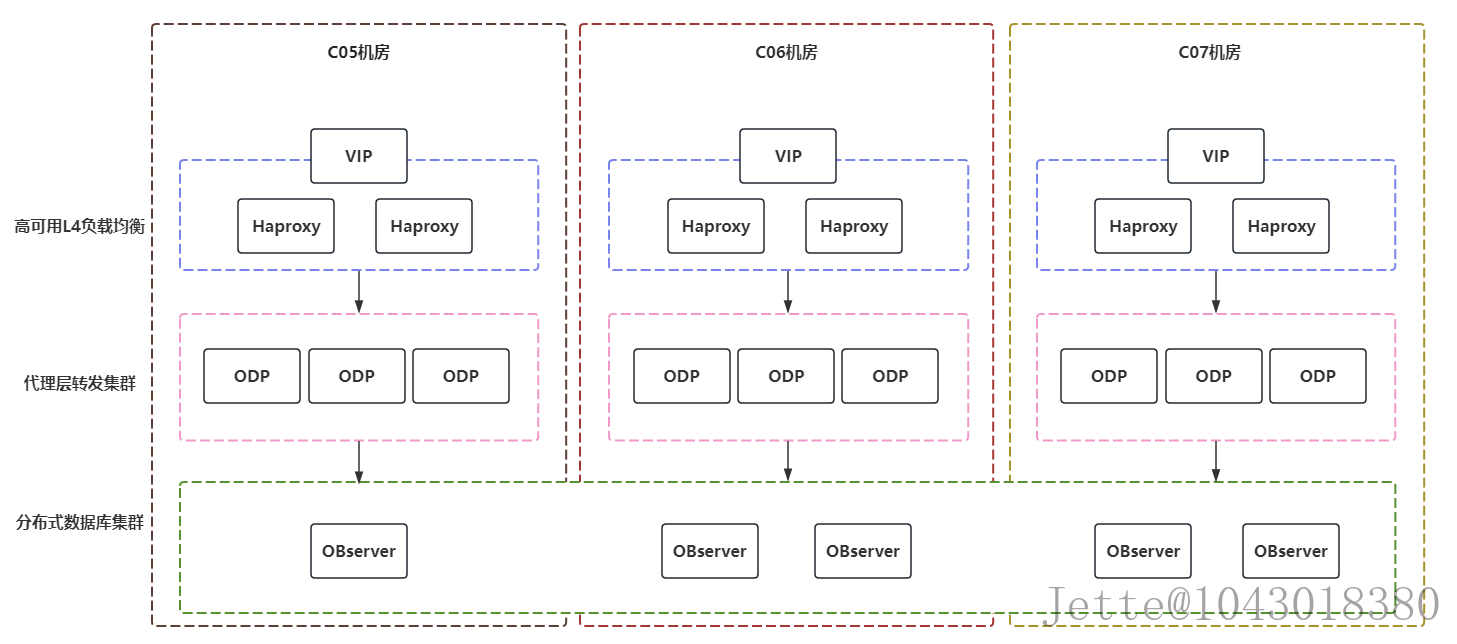
#设置IDC信息。先把配置文件转换成集群模式的配置文件,然后再热更新IDC信息,注意之前的集群规划,zone1和zone2=IDC1,zone3和zone4=IDC2,zone5=IDC3
obd cluster chst obcluster -c oceanbase-ce --style cluster
obd cluster edit-config obcluster
#然后热更新配置,添加以下配置:idc: xxxx
zones:
zone1:
idc: HK-B16
servers:
- name: server1
ip: 10.1.26.201
zone2:
idc: HK-B16
servers:
- name: server2
ip: 10.1.26.202
zone3:
idc: HK-B17
servers:
- name: server3
ip: 10.1.29.11
zone4:
idc: HK-B17
servers:
- name: server4
ip: 10.1.29.12
zone5:
idc: HK-B14
servers:
- name: server5
ip: 10.1.30.11
#热更新完配置文件,然后需要重载配置文件。
obd cluster reload obcluster
#再次检查是否满足OCP接管集群的条件,如果满足条件。则需要部署OCP管理平台
obd cluster check4ocp obcluster
#需要需要创建2个租户(数据库),分别是MetaDB、MonitorDB给OCP使用
创建资源单元:
CREATE RESOURCE UNIT resource_unit_ocp_meta MAX_CPU 4, MIN_CPU 1, MEMORY_SIZE '8G', MAX_IOPS 10000, MIN_IOPS 10000, IOPS_WEIGHT 0, LOG_DISK_SIZE '30G';
创建资源池:
CREATE RESOURCE POOL ocp_metadb_pool UNIT='resource_unit_ocp_meta',UNIT_NUM=1,ZONE_LIST=('zone1','zone2','zone3','zone4','zone5');
创建租户:
CREATE TENANT IF NOT EXISTS ocp_meta_tenant charset='utf8mb4', replica_num=5, zone_list=('zone1','zone2','zone3','zone4','zone5'), primary_zone='zone1,zone2;zone3,zone4,zone5', resource_pool_list=('ocp_metadb_pool');
#重要:授权白名单给普通租户!
ALTER TENANT ocp_meta_tenant SET VARIABLES ob_tcp_invited_nodes='%';
#登录并进入meta_tenant租户里,设置root密码。创建普通用户和库
obclient -h10.1.26.204 -P2883 -uroot@ocp_meta_tenant
select user,password from mysql.user;
ALTER USER 'root' IDENTIFIED BY 'xxx';
CREATE DATABASE meta_database DEFAULT CHARACTER SET UTF8;
CREATE USER IF NOT EXISTS meta_user IDENTIFIED BY 'xx';
GRANT ALL ON *.* TO meta_user;
SHOW GRANTS FOR meta_user;
#登录系统的root@sys最高权限,创建monitor的资源单元、资源池、租户。至少4C16G
创建资源单元:
CREATE RESOURCE UNIT resource_unit_ocp_monitor MAX_CPU 4, MIN_CPU 1, MEMORY_SIZE '16G', MAX_IOPS 10000, MIN_IOPS 10000, IOPS_WEIGHT 0, LOG_DISK_SIZE '50G';
创建资源池:
CREATE RESOURCE POOL ocp_monitor_pool UNIT='resource_unit_ocp_monitor',UNIT_NUM=1,ZONE_LIST=('zone1','zone2','zone3','zone4','zone5');
创建租户:
CREATE TENANT IF NOT EXISTS ocp_monitor_tenant charset='utf8mb4', replica_num=3, zone_list=('zone1','zone2','zone3','zone4','zone5'), primary_zone='zone1,zone2;zone3,zone4,zone5', resource_pool_list=('ocp_monitor_pool');
授权远程访问:
ALTER TENANT ocp_monitor_tenant SET VARIABLES ob_tcp_invited_nodes='%';
#登录并进入monitor_tenant租户里,创建普通用户和库
obclient -h10.1.26.204 -P2883 -uroot@ocp_monitor_tenant
select user,password from mysql.user;
ALTER USER 'root' IDENTIFIED BY 'xxx';
CREATE DATABASE monitor_database DEFAULT CHARACTER SET UTF8;
CREATE USER IF NOT EXISTS monitor_user IDENTIFIED BY 'xxx';
GRANT ALL ON *.* TO monitor_user;
SHOW GRANTS FOR monitor_user;
#然后下载OCP,并解压修改配置文件。
wget https://obbusiness-private.oss-cn-shanghai.aliyuncs.com/download-center/opensource/ocp/4.0.3/ocp-4.0.3-ce-x86_64.tar.gz
tar zxf ocp-4.0.3-ce-x86_64.tar.gz
#然后修改配置文件
cat config.yaml
# OCP deploy config
# Note:
# Do not use 127.0.0.1 or hostname as server address
# When a server has both public ip and private ip, if private ip is connectable, use private ip for faster connection
# If a vip is configured, it should be already created and bonded to the right server and port, the installation script won't do any work with vip maintainance, just use it to connect to the service
# Ignore precheck errors
# It's recommanded to not ignore precheck errors
precheck_ignore: true
# Create an obcluster as OCP's metadb
create_metadb_cluster: false
# Clean OCP's metadb cluster when uninstall
clean_metadb_cluster: false
# Metadb cluster deploy config
ob_cluster:
name: gx-obcluster
home_path: /home/admin/oceanbase
root_password: 'xxx'
# The directory for data storage, it's recommanded to use an independent path
data_path: /home/admin/data
# The directory for clog, ilog, and slog, it's recommanded to use an independent path.
redo_path: /home/admin/logs
sql_port: 2881
rpc_port: 2882
zones:
- name: zone1
servers:
- 172.18.5.11
- name: zone2
servers:
- 172.18.5.12
- name: zone3
servers:
- 172.18.5.13
meta:
tenant: ocp_meta_tenant
user: meta_user
password: 'xxx'
database: meta_database
cpu: 4
# Memory configs in GB, 4 means 4GB
memory: 8
# Monitor user info
monitor:
tenant: ocp_monitor_tenant
user: monitor_user
password: 'xxx'
database: monitor_database
cpu: 4
# Memory configs in GB, 8 means 8GB
memory: 16
# Obproxy to connect metadb cluster
obproxy:
home_path: /home/admin/obproxy
port: 2883
servers:
- 172.18.5.14
- 172.18.5.15
- 172.18.5.16
ssh:
port: 22
user: root
# auth method, support password and pubkey
auth_method: password
timeout: 10
password: xxx
# OCP config
ocp:
# ocp container's name
name: 'ocp'
# OCP process listen port and log dir on host
process:
port: 8080
log_dir: /tmp/ocp/log
servers:
- 172.18.5.17
# OCP container's resource
resource:
cpu: 4
# Memory configs in GB, 8 means 8GB
memory: 12
auth:
user: admin
password: xxx
options:
# enable front-end tracking, non-business sensitive data such as system information, user behavior, and front-end anomalies will be collected to improve the product experience and stability
enable_web_tracking: false
# OCP metadb config, for ocp installation, if "create_metadb_cluster" is configured true, this part will be replaced with the configuration of metadb cluster and obproxy
metadb:
host: 172.18.5.8#填写VIP,端口2888是ocp专用的3台obproxy,使用obd部署的。业务使用的3台obproxy是ocp创建的,因为非ocp创建的obproxy无法接管
port: 2888
meta_user: meta_user@ocp_meta_tenant
meta_password: 'xxx'
meta_database: meta_database
monitor_user: monitor_user@ocp_monitor_tenant
monitor_password: 'xxx'
monitor_database: monitor_database
#然后执行安装脚本,耐心等待。可以开另一个窗口,打开docker容器的日志查看进度。
./ocp_installer.sh install -c config.yaml -i ./ocp-installer.tar.gz -o ./ocp.tar.gz
#这个是重新启动的命令。如果已经安装好的,则只能使用该重启命令
./ocp_installer.sh replace -c config.yaml -i ./ocp-installer.tar.gz -o ./ocp.tar.gz
#等待启动完成后,访问OCP页面