背景业务系统要做同城多机房灾备架构,机房A挂了后,流量转到机房B,但kafka的数据,如何在A和B两个机房共用。
方案选型与架构
因为kafka 的mirror-maker2 新增了诸多特性,如权限同步,消费者组offset同步,动态同步topic与group信息,同步速度高的情况;所以使用mirror-maker2 来进行存量与增量同步;
在调研测试中发现当前使用的kafka2.7版本并不支持topic迁移后保持完全一样;在kafka3.0 版本的mirror-maker2 增加了支持topic单向不带前缀同步的功能;
了解到mm1有一个缺陷,因为mm1备份数据的时候,源集群和目标集群的topic名称都是一样的,所以可能出现两个集群的消息无限递归的情况(就是两个名称相同的topic,一条消息a传b,b再传a,循环往复)。mm2解决了这个缺陷,采用了给topic加一个前缀的方式,如果是两个集群相互备份,那么有前缀的topic的消息,是不会备份的。但是也可以把topic前缀去掉,但这只能单向同步。
mm1配置信息和topic acl相关的信息是不会同步的,这会给集群管理带来一定的困难,所以mm2解决了这个问题,即源集群的配置和acl都会自动同步到目标集群中。
原理图:

mirror-maker2内部topic设计
mm2会在kafka生成多个内部topic ,来存储源集群topic相关的状态和配置信息,以及维持心跳。主要有三个内部topic:
- hearbeat topic
- checkpoints topic
- offset sync topic
heartbeat topic
在默认的配置中,源集群和目标集群都会有一个用于发送心跳的topic,consumer 客户端通过这个 topic,一方面可以确认当前的 connector 是否存活,另一方面确认源集群是否处于可用状态。
heartbeat topic的schema如下:
- target cluster:接收心跳集群
- source cluster:发送心跳的集群
- timestamp:时间戳
checkpoints topic
对应的connector(即MirrorCheckpointConnector)会定期向目标集群发送checkpoint信息,主要是consumer group提交的offset ,以及相关辅助信息。
checkpoints topic 的schema如下:
- consumer group id (String)
- topic (String) :包含源集群和目标集群的 topic
- partition (int)
- upstream offset (int): 源集群指定consumer group已提交的offset(latest committed offset in source cluster)
- downstream offset (int): 目标集群已同步的offset(latest committed offset translated to target cluster)
- metadata (String):partition元数据
- timestamp
mm2提供的另一个功能,consumer切换集群消费就是通过这个topic实现的。因为这个topic中存放了源集群consumer group的消费offset,在某些场景(比如源集群故障)下要切换consumer到目标集群,就可以通过这个topic获取消费offset然后继续消费。
offset sync topic
这个topic ,主要是在两个集群间同步topic partition的offset。这里的offset并不是consumer的offset,而是日志的offset。
它的 schema 如下:
- topic (String):topic 名
- partition (int)
- upstream offset (int):源集群的 offset
- downstream offset (int):目标集群的 offset,和源集群的应该保持一致
config sync topic
mm2会将源集群的数据同步到目标集群,那么目标集群对应的topic的读写权限上怎样的呢?mm2约定了,目标集群对应的topic(源集群备份的那个)只有source和sink connector能够写入。为了实施此策略,MM2使用以下规则将 ACL 策略传播到下游主题:
- 若用户对源集群的topic有read的权限,那么对目标集群对应的topic也有read的权限
- 除了mm2,别的用户都不能写入目标集群对应的topic,同时会同步topic相关配置信息
约束与限制
- 源集群中节点的IP地址和端口号不能和目标集群中节点的IP地址和端口号相同,否则会导致数据在Topic内无限循环复制。
- 使用MirrorMaker同步数据,至少需要有两个或以上集群,不可在单个集群内部使用MirrorMaker,否则会导致数据在Topic内无限循环复制。
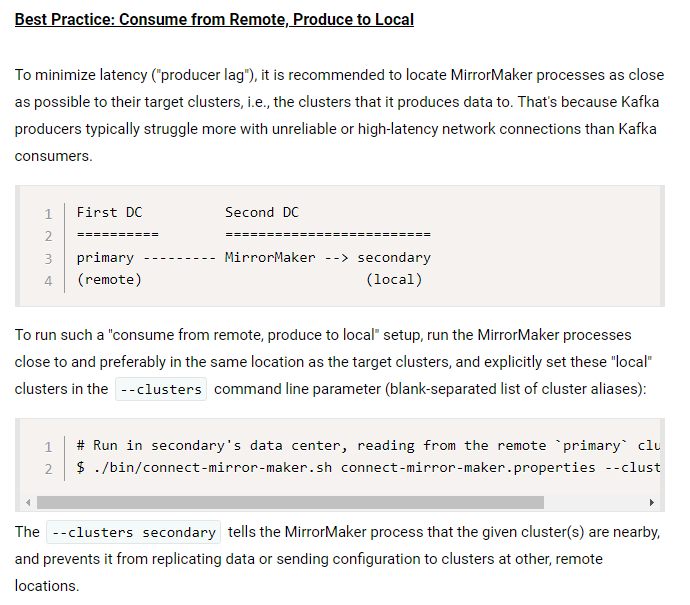
- mm2和mm1一样,在最简单的主从备份场景中,mm2建议部署在目标(target)集群,即从远端消费然后本地写入。如果部署在源集群端,那么出错的时候可能会出现丢数据的情况。
Kafka 管理员可以定义跨越各个 Kafka 集群、数据中心或地理区域边界的数据流。组织、技术或法律要求通常需要此类事件流设置。常见场景包括:
- 异地复制
- 灾难恢复
- 将边缘集群馈送到中央聚合集群
- 集群的物理隔离(例如生产与测试)
- 云迁移或混合云部署
- 法律和合规要求
管理员可以使用 Kafka 的 MirrorMaker(版本 2)设置此类集群间数据流,这是一种以流式传输方式在不同 Kafka 环境之间复制数据的工具。MirrorMaker 构建在 Kafka Connect 框架之上,支持以下功能:
- 复制主题(数据加配置)
- 复制消费者组,包括在集群之间迁移应用程序的偏移量
- 复制 ACL
- 保留分区
- 自动检测新主题和分区
- 提供广泛的指标,例如跨多个数据中心/集群的端到端复制延迟
- 容错和水平可扩展的操作
注意:使用 MirrorMaker 进行异地复制可跨 Kafka 集群复制数据。这种集群间复制与 Kafka 的集群内复制不同,后者在同一个 Kafka 集群内复制数据。
借助 MirrorMaker,Kafka 管理员可以将主题、主题配置、消费者组及其偏移量以及 ACL 从一个或多个源 Kafka 集群复制到一个或多个目标 Kafka 集群,即跨集群环境。简而言之,MirrorMaker 使用连接器从源集群进行消费并生产到目标集群。
这些从源集群到目标集群的定向流称为复制流。它们是使用 MirrorMaker 配置文件中的格式定义的,{source_cluster}->{target_cluster}如下所述。管理员可以根据这些流程创建复杂的复制拓扑。
以下是一些示例模式:
- 主动/主动高可用性部署:
A->B, B->A - 主动/被动或主动/备用高可用性部署:
A->B - 聚合(例如,从多个集群到一个集群):
A->K, B->K, C->K - 扇出(例如,从一个集群到多个集群):
K->A, K->B, K->C - 转发:
A->B, B->C, C->D
默认情况下,流会复制所有主题和消费者组。但是,每个复制流都可以独立配置。例如,您可以定义仅将特定主题或消费者组从源集群复制到目标集群。
环境准备
source集群:kafka-3.1.1、3台虚拟机
target集群:kafka-3.1.1、3台虚拟机
工具:connect-mirror-maker.sh
部署jdk环境、zookeeper集群、kafka集群
#注意: 查看客户端版本号要与集群的版本对应,否则会出现警告等报错信息wget --no-check-certificate https://mirrors.tuna.tsinghua.edu.cn/apache/zookeeper/stable/apache-zookeeper-3.6.3-bin.tar.gzmkdir /usr/local/zookeepertar zxf apache-zookeeper-3.6.3-bin.tar.gz -C /usr/local/zookeepercd /usr/local/zookeeper/apache-zookeeper-3.6.3-bin/scp /root/apache-zookeeper-3.6.3-bin.tar.gz 10.7.0.78:/usr/local/scp /root/apache-zookeeper-3.6.3-bin.tar.gz 10.7.0.79:/usr/local/cat >> /etc/profile << 'EOF'export ZOOKEEPER_HOME=/usr/local/zookeeperEOFgroupadd zookeeperuseradd zookeeper -g zookeepersource /etc/profileecho $ZOOKEEPER_HOMEcd /usr/local/zookeeper/confmv zoo_sample.cfg zoo.cfgcat > zoo.cfg << 'EOF'tickTime=2000initLimit=10syncLimit=5dataDir=/usr/local/zookeeper/datadataLogDir=/usr/local/zookeeper/logsclientPort=2181server.1=10.7.0.77:2888:3888server.2=10.7.0.78:2888:3888server.3=10.7.0.79:2888:3888EOFcd ..mkdir datamkdir logsecho '1' > data/myid#第二个节点需要改成2,第三个改成3echo '2' > data/myidscp conf/zoo.cfg 10.7.0.78:/usr/local/zookeeper/conf/scp conf/zoo.cfg 10.7.0.79:/usr/local/zookeeper/conf/chown -R zookeeper.zookeeper /usr/local/zookeeper/cat >> /usr/lib/systemd/system/zookeeper.service<<'EOF'[Unit]Description=zookeeper[Service]Type=forkingEnvironment=ZOO_LOG_DIR=/usr/local/zookeeper/logs/ExecStart=/usr/local/zookeeper/bin/zkServer.sh startExecStop=/usr/local/zookeeper/bin/zkServer.sh stopExecReload=/usr/local/zookeeper/bin/zkServer.sh restartRestart=alwaysUser=zookeeperGroup=zookeeperRestartSec=5OOMScoreAdjust=-1000StartLimitInterval=0StartLimitBurst=5[Install]WantedBy=multi-user.targetEOFchown -R zookeeper.zookeeper /usr/local/zookeepersystemctl daemon-reloadsystemctl enable --now zookeepersystemctl status zookeeper#查看状态bash $ZOOKEEPER_HOME/bin/zkServer.sh statusbash $ZOOKEEPER_HOME/bin/zkCli.sh -server 10.7.0.77:2181bash $ZOOKEEPER_HOME/bin/zkServer.sh status#部署kafka集群修改配置文件,注意修改logs目录、id号每个节点都是唯一的、监听地址:自身ip+9092cat >> /etc/profile <<'EOF'export JAVA_HOME=/usr/lib/jvm/adoptopenjdk-11-hotspot-amd64export JRE_HOME=${JAVA_HOME}/jreexport CLASSPATH=.:${JAVA_HOME}/lib:${JRE_HOME}/libexport PATH=${JAVA_HOME}/bin:$PATHEOFsource /etc/profileecho $JAVA_HOMEmkdir /usr/local/kafkatar zxf kafka_2.13-3.1.1.tgz -C /usr/local/kafkacd /usr/local/kafka/mv kafka_2.13-3.1.1/* .rm -rf kafka_2.13-3.1.1/vim config/server.properties # Licensed to the Apache Software Foundation (ASF) under one or more# contributor license agreements. See the NOTICE file distributed with# this work for additional information regarding copyright ownership.# The ASF licenses this file to You under the Apache License, Version 2.0# (the "License"); you may not use this file except in compliance with# the License. You may obtain a copy of the License at## http://www.apache.org/licenses/LICENSE-2.0## Unless required by applicable law or agreed to in writing, software# distributed under the License is distributed on an "AS IS" BASIS,# WITHOUT WARRANTIES OR CONDITIONS OF ANY KIND, either express or implied.# See the License for the specific language governing permissions and# limitations under the License.# see kafka.server.KafkaConfig for additional details and defaults############################# Server Basics ############################## The id of the broker. This must be set to a unique integer for each broker.broker.id=1############################# Socket Server Settings ############################## The address the socket server listens on. It will get the value returned from # java.net.InetAddress.getCanonicalHostName() if not configured.# FORMAT:# listeners = listener_name://host_name:port# EXAMPLE:# listeners = PLAINTEXT://your.host.name:9092listeners=PLAINTEXT://10.7.0.80:9092# Hostname and port the broker will advertise to producers and consumers. If not set, # it uses the value for "listeners" if configured. Otherwise, it will use the value# returned from java.net.InetAddress.getCanonicalHostName().advertised.listeners=PLAINTEXT://10.7.0.80:9092auto.create.topics.enable=falseunclean.leader.election.enable=falseauto.leader.rebalance.enable=falsequeued.max.requests=1000# Maps listener names to security protocols, the default is for them to be the same. See the config documentation for more details#listener.security.protocol.map=PLAINTEXT:PLAINTEXT,SSL:SSL,SASL_PLAINTEXT:SASL_PLAINTEXT,SASL_SSL:SASL_SSL# The number of threads that the server uses for receiving requests from the network and sending responses to the networknum.network.threads=6# The number of threads that the server uses for processing requests, which may include disk I/Onum.io.threads=8# The send buffer (SO_SNDBUF) used by the socket serversocket.send.buffer.bytes=102400# The receive buffer (SO_RCVBUF) used by the socket serversocket.receive.buffer.bytes=102400# The maximum size of a request that the socket server will accept (protection against OOM)socket.request.max.bytes=104857600############################# Log Basics ############################## A comma separated list of directories under which to store log fileslog.dirs=/usr/local/kafka/logs# The default number of log partitions per topic. More partitions allow greater# parallelism for consumption, but this will also result in more files across# the brokers.num.partitions=3# The number of threads per data directory to be used for log recovery at startup and flushing at shutdown.# This value is recommended to be increased for installations with data dirs located in RAID array.num.recovery.threads.per.data.dir=3############################# Internal Topic Settings ############################## The replication factor for the group metadata internal topics "__consumer_offsets" and "__transaction_state"# For anything other than development testing, a value greater than 1 is recommended to ensure availability such as 3.offsets.topic.replication.factor=1transaction.state.log.replication.factor=1transaction.state.log.min.isr=1message.max.bytes=10485760default.replication.factor=3delete.topic.enable=true############################# Log Flush Policy ############################## Messages are immediately written to the filesystem but by default we only fsync() to sync# the OS cache lazily. The following configurations control the flush of data to disk.# There are a few important trade-offs here:# 1. Durability: Unflushed data may be lost if you are not using replication.# 2. Latency: Very large flush intervals may lead to latency spikes when the flush does occur as there will be a lot of data to flush.# 3. Throughput: The flush is generally the most expensive operation, and a small flush interval may lead to excessive seeks.# The settings below allow one to configure the flush policy to flush data after a period of time or# every N messages (or both). This can be done globally and overridden on a per-topic basis.# The number of messages to accept before forcing a flush of data to disk#log.flush.interval.messages=10000# The maximum amount of time a message can sit in a log before we force a flush#log.flush.interval.ms=1000############################# Log Retention Policy ############################## The following configurations control the disposal of log segments. The policy can# be set to delete segments after a period of time, or after a given size has accumulated.# A segment will be deleted whenever *either* of these criteria are met. Deletion always happens# from the end of the log.# The minimum age of a log file to be eligible for deletion due to agelog.retention.hours=168# A size-based retention policy for logs. Segments are pruned from the log unless the remaining# segments drop below log.retention.bytes. Functions independently of log.retention.hours.log.retention.bytes=1099511627776# The maximum size of a log segment file. When this size is reached a new log segment will be created.log.segment.bytes=1073741824# The interval at which log segments are checked to see if they can be deleted according# to the retention policieslog.retention.check.interval.ms=300000log.cleaner.enable=truelog.cleaner.threads=8############################# Zookeeper ############################## Zookeeper connection string (see zookeeper docs for details).# This is a comma separated host:port pairs, each corresponding to a zk# server. e.g. "127.0.0.1:3000,127.0.0.1:3001,127.0.0.1:3002".# You can also append an optional chroot string to the urls to specify the# root directory for all kafka znodes.zookeeper.connect=10.7.0.80:2181,10.7.0.81:2181,10.7.0.82:2181# Timeout in ms for connecting to zookeeperzookeeper.connection.timeout.ms=18000############################# Group Coordinator Settings ############################## The following configuration specifies the time, in milliseconds, that the GroupCoordinator will delay the initial consumer rebalance.# The rebalance will be further delayed by the value of group.initial.rebalance.delay.ms as new members join the group, up to a maximum of max.poll.interval.ms.# The default value for this is 3 seconds.# We override this to 0 here as it makes for a better out-of-the-box experience for development and testing.#创建日志目录mkdir /usr/local/kafka/logs -pchown -R zookeeper.zookeeper /usr/local/kafka#设置system启动cat > /lib/systemd/system/kafka.service <<'EOF'[Unit]Description=Apache Kafka server (broker)After=network.target zookeeper.service[Service]Type=forkingEnvironment=PATH=/usr/lib/jvm/adoptopenjdk-11-hotspot-amd64/bin:/usr/local/sbin:/usr/local/bin:/usr/sbin:/usr/bin:/sbin:/binExecStart=/usr/local/kafka/bin/kafka-server-start.sh -daemon /usr/local/kafka/config/server.properties ExecStop=/usr/local/kafka/bin/kafka-server-stop.shRestart=alwaysRestartSec=10StartLimitInterval=0LimitNOFILE=265535OOMScoreAdjust=-1000StartLimitBurst=5User=zookeeperGroup=zookeeper[Install]WantedBy=multi-user.targetEOFsystemctl daemon-reloadsystemctl enable --now kafkasystemctl status kafkajps#创建topic测试/usr/local/kafka/bin/kafka-topics.sh --create --bootstrap-server 10.7.0.77:9092 --partitions 3 --replication-factor 3 --topic test#查看已有的topic/usr/local/kafka/bin/kafka-topics.sh --list --bootstrap-server 10.7.0.77:9092#先开启生产者,必须要已存在的topic,进入交互式,随便输入字符。然后在消费者端就会看到/usr/local/kafka/bin/kafka-console-producer.sh --bootstrap-server 10.7.0.77:9092 --topic test#创建消费者,进入交互式之后,能够实时看见生产者发出的消息,集群正常,验证结束/usr/local/kafka/bin/kafka-console-consumer.sh --bootstrap-server 10.7.0.78:9092 --topic test --from-beginning#连接Zookeeper进入交互模式,查看节点id/usr/local/kafka/bin/zookeeper-shell.sh 127.0.0.1:2181ls /brokers/ids[0, 1, 2]get /controller{"version":1,"brokerid":0,"timestamp":"1631005545929"}#开启JMX监控修改文件/usr/local/kafka/bin/kafka-server-start.sh 添加export JMX_PORT="9999"下面的代码if [ "x$KAFKA_HEAP_OPTS" = "x" ]; then export KAFKA_HEAP_OPTS="-Xmx1G -Xms1G" export JMX_PORT="9999"fi#然后重启kafka查看端口systemctl restart kafka.service ss -lntup
配置MM2异地复制
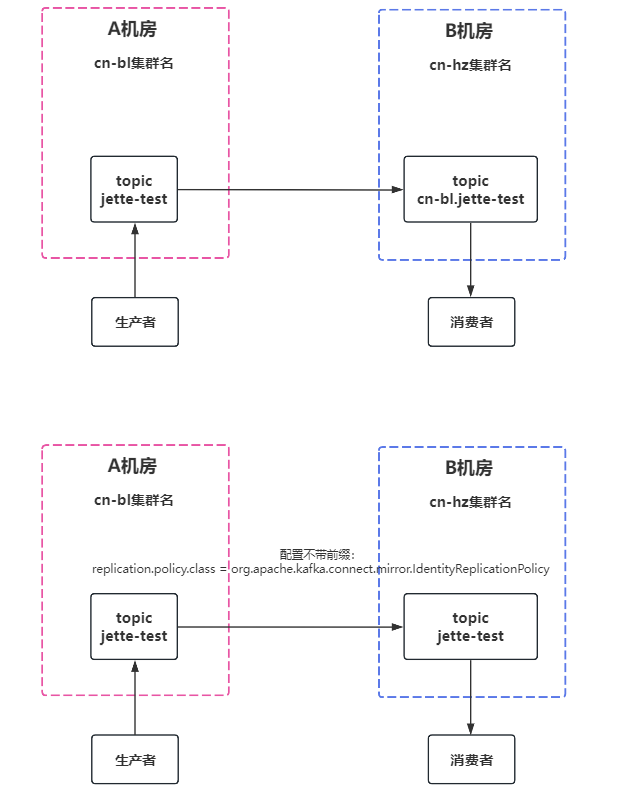
cat /usr/local/kafka/config/connect-mirror-maker.properties# Licensed to the Apache Software Foundation (ASF) under A or more# contributor license agreements. See the NOTICE file distributed with# this work for additional information regarding copyright ownership.# The ASF licenses this file to You under the Apache License, Version 2.0# (the "License"); you may not use this file except in compliance with# the License. You may obtain a copy of the License at# # http://www.apache.org/licenses/LICENSE-2.0# # Unless required by applicable law or agreed to in writing, software# distributed under the License is distributed on an "AS IS" BASIS,# WITHOUT WARRANTIES OR CONDITIONS OF ANY KIND, either express or implied.# See the License for the specific language governing permissions and# limitations under the License.# see org.apache.kafka.clients.consumer.ConsumerConfig for more details# Sample MirrorMaker 2.0 top-level configuration file# Run with ./bin/connect-mirror-maker.sh connect-mirror-maker.properties # specify any number of cluster aliasesclusters = cn-bl, cn-hz# connection information for each cluster# This is a comma separated host:port pairs for each cluster# for e.g. "A_host1:9092, A_host2:9092, A_host3:9092"cn-bl.bootstrap.servers = 10.7.0.77:9092, 10.7.0.78:9092, 10.7.0.79:9092cn-hz.bootstrap.servers = 10.7.0.80:9092, 10.7.0.81:9092, 10.7.0.82:9092# enable and configure individual replication flowscn-bl->cn-hz.enabled = true# regex which defines which topics gets replicated. For eg "foo-.*"cn-bl->cn-hz.topics = .*#cn-hz->cn-bl.enabled = true#cn-hz->cn-bl.topics = .*# Setting replication factor of newly created remote topicsreplication.factor=3############################# Internal Topic Settings ############################## The replication factor for mm2 internal topics "heartbeats", "B.checkpoints.internal" and# "mm2-offset-syncs.B.internal"# For anything other than development testing, a value greater than 1 is recommended to ensure availability such as 3.sync.topic.configs.enabled.interval.seconds = 5checkpoints.topic.replication.factor = 2heartbeats.topic.replication.factor = 2offset-syncs.topic.replication.factor = 2tasks.max = 5# The replication factor for connect internal topics "mm2-configs.B.internal", "mm2-offsets.B.internal" and# "mm2-status.B.internal"# For anything other than development testing, a value greater than 1 is recommended to ensure availability such as 3.offset.storage.replication.factor = 2status.storage.replication.factor = 2config.storage.replication.factor = 2# customize as needed# replication.policy.separator = _# sync.topic.acls.enabled = false# emit.heartbeats.interval.seconds = 5sync.topic.acls.enabled = trueemit.heartbeats.interval.seconds = 5sync.group.offsets.enabled``__consumer_offsets = trueheartbeats.topic.retention.ms = 1000checkpoints.topic.retention.ms = 1000#设置同步的topic Name命名规则;3.0版本提供了两种topic同步命名规则,默认会带上前缀,也可以手动不带前缀的----此时不能做双向同步,灾备模式建议使用这个,两边机房集群的topic名字一致replication.policy.class = org.apache.kafka.connect.mirror.IdentityReplicationPolicy#添加systemd托管启动cat >> /lib/systemd/system/kafka-mirror-maker.service << 'EOF'[Unit]Description=Kafka Mirror MakerAfter=network.target[Service]Type=simpleExecStart=/usr/local/kafka/bin/connect-mirror-maker.sh /usr/local/kafka/config/connect-mirror-maker.propertiesExecStop=/bin/kill $MAINPIDExecReload=/bin/kill -s HUP $MAINPIDRestart=alwaysRestartSec=10StartLimitInterval=0LimitNOFILE=265535OOMScoreAdjust=-1000StartLimitBurst=5[Install]WantedBy=multi-user.targetEOFsystemctl daemon-reloadsystemctl enable --now kafka-mirror-maker.service#启动mm2之后,测试验证同步是否正常。默认目标集群的topic是带有源集群名字前缀的,所以源集群topic名字为:jette-test,那么目标集群的topic名字为:cn-bl.jette-test。所以在源集群jette-test的topic生产消息,那么在目标集群就需要在cn-bl.jette-test这个topic消费消息。topic对不上肯定是无法消费到消息的,主题要一致!#如果只是单向同步的需求,配置文件可以将带有集群名字的前缀topic去掉,目标集群的topic就跟源集群的topic名字一样了。见下图:
验证MM2的同步效果
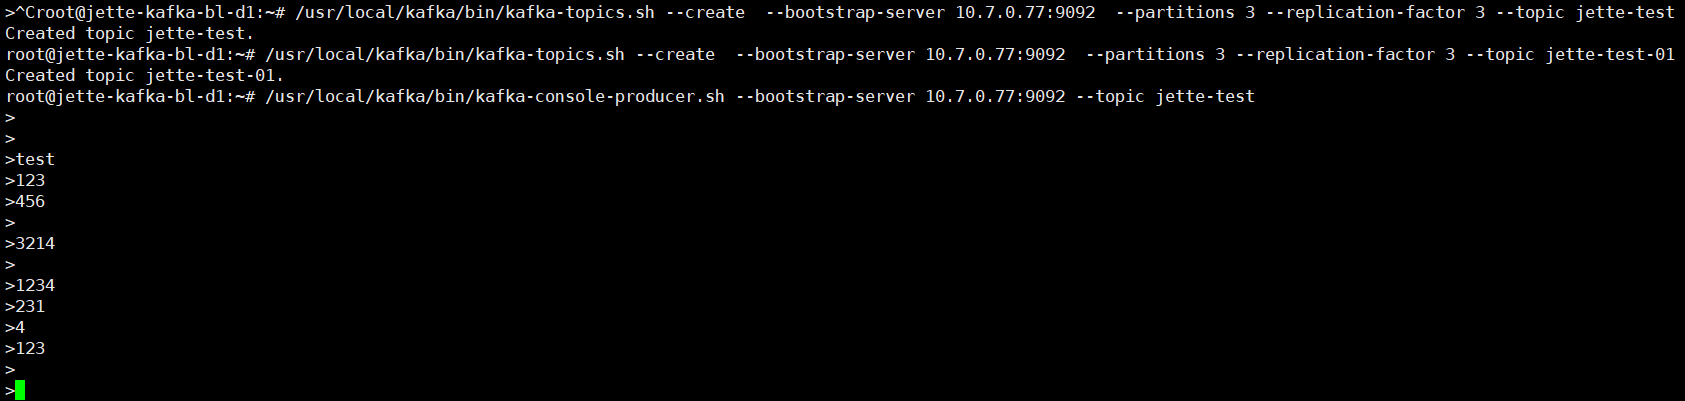
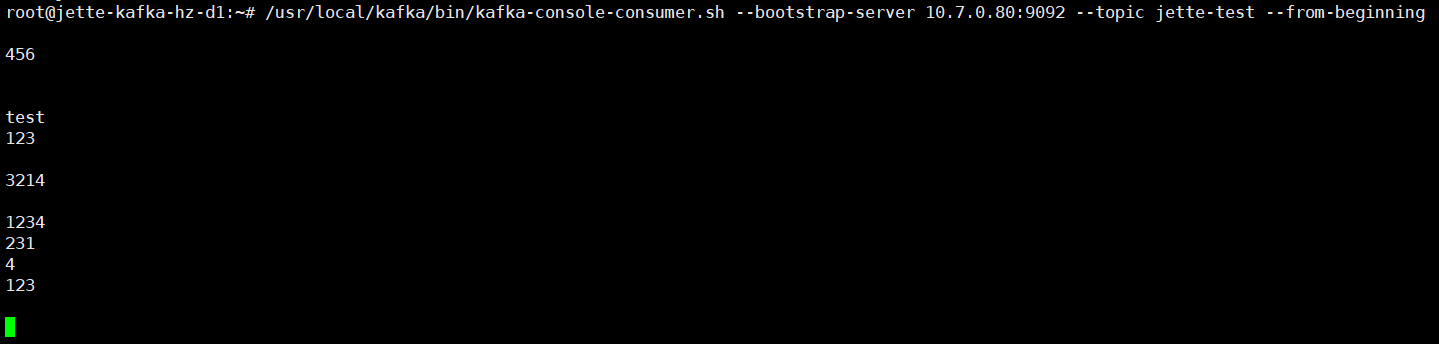
#源集群创建topic/usr/local/kafka/bin/kafka-topics.sh --create --bootstrap-server 10.7.0.77:9092 --partitions 3 --replication-factor 3 --topic jette-test#目标集群查看topic/usr/local/kafka/bin/kafka-topics.sh --list --bootstrap-server 10.7.0.80:9092__consumer_offsetscn-bl.checkpoints.internalcn-bl.heartbeatsheartbeatsjette-testjette-test-01mm2-configs.cn-bl.internalmm2-offset-syncs.cn-bl.internalmm2-offsets.cn-bl.internalmm2-status.cn-bl.internal#源集群生产/usr/local/kafka/bin/kafka-console-producer.sh --bootstrap-server 10.7.0.77:9092 --topic jette-test#目标集群消费。消费者刚打开会有延迟需要等一会才显示/usr/local/kafka/bin/kafka-console-consumer.sh --bootstrap-server 10.7.0.80:9092 --topic jette-test --from-beginning
下图为MM2异地复制验证成功举例:
]]>


.png)
.png)
.png)
.png)